# 2. 네임스페이스, 컨피그맵, 시크릿, 인그레스
# namespace
- 리소스들을 구분 지어 관리할 수 있는 논리적인 그룹 → namespace라는 오브젝트 제공
- 쿠버네티스 리소스들이 묶여 있는 하나의 가상 공간 / 그룹
kubectl get namespaces,kubectl get ns로 확인 가능kubectl get pods --namespace default: --namespace or -n 옵션으로 특정 네임스페이스에 생성된 리소스 확인 가능- default는 기본적으로 쿠버네티스 리소스가 생성되는 네임스페이스
# namespace vs label
- 라벨의 경우
kubectl get pods -l app=webserver이런식으로 검색 가능 - 네임스페이스는 라벨보다 더 넓은 용도로 사용 가능
- 특정 네임스페이스에서 생성되는 포드의 자원 사용량 제한
- 특정 네임스페이스에서 생성되는 포드에는 항상 사이드카 컨테이너가 붙도록 설정 가능
- 사용 목적에 따라 리소스를 격리함으로써 편리하게 구분 가능
# 네임스페이스 생성
- yaml
apiVersion: v1
kind: Namespace
metadata:
  name: production
- 명령어
kubectl create namespace production
- 특정 네임스페이스에 리소스 생성 시 yaml 파일에서 metadata.namespace를 설정하면 됨
apiVersion: v1
kind: Pod
metadata:
  name: my-nginx-pod
  namespace: production
spec:
  containers:
    - name: my-nginx-container
      image: nginx:latest
      ports:
        - containerPort: 80
          protocol: TCP
# 하나의 yaml 파일에서 여러 리소스 정의
---를 사용하여 하나의 yaml 파일에서 여러 개의 리소스 정의 가능
apiVersion: v1
kind: Namespace
metadata:
  name: production

---
apiVersion: v1
kind: Pod
metadata:
  name: my-nginx-pod
  namespace: production
spec:
  containers:
    - name: my-nginx-container
      image: nginx:latest
      ports:
        - containerPort: 80
          protocol: TCP
- kubectl get 명령어에 --all-namespaces 옵션을 사용하면 모든 네임스페이스의 리소스 확인 가능
# 네임스페이스 서비스 접근
- 서비스 이름 만으로는 같은 네임스페이스 내의 서비스끼리만 접근 가능
<서비스 이름>.<네임스페이스 이름>.svc로 다른 네임스페이스의 서비스에도 접근 가능
# 네임스페이스 삭제
- kubectl delete -f <yaml 파일명>
- kubectl delete namespace
- 로 삭제 가능하지만 해당 네임스페이스에 존재하는 리소스도 모두 삭제되기 때문에 조심해야 함
# 네임스페이스에 종속되는 오브젝트
kubectl api-resources --namespaced=true로 네임스페이스에 속하는지 확인 가능- false로 설정하면 네임스페이스에 속하지 않는 오브젝트들 확인 가능
- node, namespace, persistent volume 등
# Configmap, Secret
- 애플리케이션의 설정값 지정하려면
- yaml 파일에 환경 변수 직접 적어놓기 → 상황에 따라서는 환경 변수 값만 다른 동일한 여러 개의 yaml이 존재할 수 있음
- ex) 운영 / 개발 환경 분리
- Configmap, Secret 오브젝트 사용
- 컨피그맵에는 설정값, 시크릿에는 비밀값 저장
# 컨피그맵
- 일반적인 설정값 담아 저장
- 네임스페이스에 속함
# 컨피그맵 생성
- yaml
apiVersion: v1
kind: ConfigMap
metadata:
  name: mysql-config
data:
  MYSQL_ROOT_PASSWORD: test123
  MYSQL_DATABASE: test
- 명령어 사용
- kubectl create configmap <컨피그맵 이름> <각종 설정값들>
`kubectl create configmap mysql-config --from-literal MYSQL_ROOT_PASSWORD=test123 \
  --from-literal MYSQL_DATABASE=test`
# 컨피그맵 확인
dgh0001@rpi4b:~$ kubectl get cm
NAME                DATA   AGE
kube-root-ca.crt    1      34d
mysql-config        2      5s
prometheus-config   1      28d
web-config          9      29d

dgh0001@rpi4b:~$ kubectl describe cm mysql-config
Name:         mysql-config
Namespace:    default
Labels:       <none>
Annotations:  <none>

Data
====
MYSQL_DATABASE:
----
test

MYSQL_ROOT_PASSWORD:
----
test123


BinaryData
====

Events:  <none>
# 컨피그맵 값 가져오기
# 용도
- 컨피그맵의 값을 컨테이너의 환경 변수로 사용
- 애플리케이션이 시스템 환경 변수로부터 설정값을 가져오는 경우
- ex) LOG_LEVEL
apiVersion: v1
kind: Pod
metadata:
  name: mysql-container
spec:
  containers:
    - name: my-container
      image: mysql:8.0
      envFrom:
        - configMapRef:
            name: mysql-config
실행 결과
dgh0001@rpi4b:~$ kubectl exec -it mysql-container -- bash

bash-5.1# mysql -u root -p
Enter password:
Welcome to the MySQL monitor.  Commands end with ; or \g.
Your MySQL connection id is 10
Server version: 8.0.43 MySQL Community Server - GPL

Copyright (c) 2000, 2025, Oracle and/or its affiliates.

Oracle is a registered trademark of Oracle Corporation and/or its
affiliates. Other names may be trademarks of their respective
owners.

Type 'help;' or '\h' for help. Type '\c' to clear the current input statement.

mysql> show databases;
+--------------------+
| Database           |
+--------------------+
| information_schema |
| mysql              |
| performance_schema |
| sys                |
| test               |
+--------------------+
5 rows in set (0.00 sec)
- 컨피그맵의 값을 포드 내부의 파일로 마운트해 사용
- 애플리케이션이 특정 파일을 통해 설정값을 읽어오는 경우
- ex) nginx → nginx.conf를 통해 설정값을 읽어옴
# deploy-prometheus.yaml
apiVersion: apps/v1
kind: Deployment
metadata:
  name: prometheus
spec:
  replicas: 1
  selector:
    matchLabels:
      app: prometheus
  template:
    metadata:
      labels:
        app: prometheus
    spec:
      containers:
        - name: prometheus
          image: prom/prometheus
          args:
            - --config.file=/etc/prometheus/prometheus.yml
          ports:
            - containerPort: 9090
          resources:
            requests:
              cpu: "250m"
              memory: "256Mi"
            limits:
              cpu: "500m"
              memory: "512Mi"
          volumeMounts:
            - name: prometheus-config # volumes에서 정의한 컨피그맵 볼륨 이름
              mountPath: /etc/prometheus # 컨피그맵의 데이터가 위치할 경로
      volumes:
        - name: prometheus-config # 컨피그맵 볼륨 이름
          configMap:
            name: prometheus-config # 컨피그맵 이름
# config-prometheus.yaml
apiVersion: v1
kind: ConfigMap
metadata:
  name: prometheus-config
data:
  prometheus.yml: |
    global:
      scrape_interval: 5s
      evaluation_interval: 5s

    scrape_configs:
      - job_name: "spring-boot-app"
        metrics_path: "/actuator/prometheus"
        static_configs:
          - targets: [ "svc-clusterip:80" ]
- 키:값 에 대해 파일명이 키, 파일 내용이 값으로 만들어짐
- 원하는 특정 값만 가져올 수도 있음
        volumeMounts:
        - name: prometheus-config
          mountPath: /etc/prometheus
      volumes:
      - name: prometheus-config
        configMap:
          name: prometheus-config
          items:
          - key: prometheus.yml # prometheus.yml 라는 키에 대응하는 값 가져오기
            path: new-proemetheus.yml # 최종 파일 이름
# 파일로부터 컨피그맵 생성
- --from-file 옵션 사용
- 자동으로 파일명이 키, 파일 내용이 값이 되어 컨피그맵으로 생성됨
dgh0001@rpi4b:~$ echo helo world > index.html
dgh0001@rpi4b:~$ kubectl create configmap index-file --from-file index.html
configmap/index-file created
dgh0001@rpi4b:~$ kubectl describe configmap index-file
Name:         index-file
Namespace:    default
Labels:       <none>
Annotations:  <none>

Data
====
index.html:
----
helo world


BinaryData
====

Events:  <none>
- --from-env-file 옵션으로 여러 개의 키-값 형태의 내용으로 구성된 설정파일을 한번에 컨피그맵으로 가져올 수 있음
dgh0001@rpi4b:~$ cat keyval
mykey1=myval1
mykey2=myval2
mykey3=myval3
dgh0001@rpi4b:~$ kubectl create configmap from-envfile --from-env-file keyval
configmap/from-envfile created
dgh0001@rpi4b:~$ kubectl get cm from-envfile -o yaml
apiVersion: v1
data:
  mykey1: myval1
  mykey2: myval2
  mykey3: myval3
kind: ConfigMap
metadata:
  creationTimestamp: "2025-10-22T02:49:37Z"
  name: from-envfile
  namespace: default
  resourceVersion: "1265915"
  uid: dc388e38-603e-45fd-9897-4be2ea1ef9b8
# 쉽게 컨피그맵 yaml 정의하기
- --dry-run 과 -o yaml 옵션으로 쉽게 yaml 생성 가능
dgh0001@rpi4b:~$ kubectl create configmap easy-configmap \
> --from-literal mykey=myval --dry-run=client -o yaml
apiVersion: v1
data:
  mykey: myval
kind: ConfigMap
metadata:
  name: easy-configmap
# dry run
- 특정 작업의 실행 가능 여부 확인
--dry-run=client옵션으로 실행 가능 여부를 확인할 수 있으며 실제로 리소스를 생성하진 않음
# 시크릿
- ssh 키, 비밀번호 등과 같은 민감한 정보를 저장하기 위한 용도
- 네임스페이스에 종속
- 컨피그맵처럼 --from-literal, --from-file, --from-env-file 옵션으로 생성 가능
dgh0001@rpi4b:~$ kubectl create secret generic \
> my-password --from-literal password=1q2w3e4r
secret/my-password created

dgh0001@rpi4b:~$ kubectl describe secret my-password
Name:         my-password
Namespace:    default
Labels:       <none>
Annotations:  <none>

Type:  Opaque

Data
====
password:  8 bytes

dgh0001@rpi4b:~$ kubectl get secret my-password -o yaml
apiVersion: v1
data:
  password: MXEydzNlNHI=
kind: Secret
metadata:
  creationTimestamp: "2025-10-22T03:31:17Z"
  name: my-password
  namespace: default
  resourceVersion: "1267015"
  uid: 362d7fc4-8400-486a-8914-5f6e1463f6fe
type: Opaque
- 시크릿에 값 저장 시 쿠버네티스가 기본적으로 base64로 값 인코딩
dgh0001@rpi4b:~$ echo MXEydzNlNHI= | base64 -d
1q2w3e4r
- 디코딩하면 원래 값 나오는 모습
# 사용 방법
...
spec:
  containers:
    envFrom:
    - secretRef:
        name: my-password

---

      env:
    - name: PASSWORD
      valueFrom:
        secretKeyRef:
          name: my-password
          key: password

---

      volumeMounts:
      - name: secret-volume
        mountPath: /etc/config
  volumes:
  - name: secret-volume
    secret:
      secretName: my-password

---

      volumeMounts:
      - name: secret-volume
        mountPath: /etc/config
  volumes:
  - name: secret-volume
    secret:
      secretName: my-password # 시크릿 이름
      items: # 시크릿에서 가져올 키-값 목록
      - key: password # 키
        path: new-password # 최종 파일은 /etc/config/new-password 가 됨
# 시크릿 종류
- Opaque
- 별도로 종류를 명시하지 않으면 자동으로 설정되는 타입
dgh0001@rpi4b:~$ kubectl create secret generic \
> my-password --from-literal password=1q2w3e4r
secret/my-password created
- 여기서 사용한 generic이 Opaque 타입
- docker-registry
- 프라이빗 레지스트리 접근 시 사용
- ex) 사설 레지스트리, 도커 허브, GCR, ECR 등을 사용하는 경우
- tls
- tls 연결에 사용되는 공개키, 비밀키 등을 쿠버네티스에 자체적으로 저장 가능
dgh0001@rpi4b:~$ openssl req -new -newkey rsa:4096 -days 365 -nodes \
> -x509 -subj "/CN=example.com" -keyout cert.key -out cert.crt
...

dgh0001@rpi4b:~$ ls cert.*
cert.crt  cert.key

dgh0001@rpi4b:~$ kubectl create secret tls my-tls-secret \
> --cert cert.crt --key cert.key
secret/my-tls-secret created
dgh0001@rpi4b:~$ kubectl get secrets my-tls-secret -o yaml
apiVersion: v1
data:
  tls.crt: LS0tLS1CRUdJ...
  tls.key: LS0tLS1CRUdJ...
kind: Secret
metadata:
  creationTimestamp: "2025-10-22T03:49:23Z"
  name: my-tls-secret
  namespace: default
  resourceVersion: "1267502"
  uid: b0fa1bfa-3faf-4ad0-8cbb-8ff78c3dad27
type: kubernetes.io/tls
dgh0001@rpi4b:~$
# Ingress
- 외부에서 오는 요청을 어떻게 처리할 것인지 네트워크 7계층 레벨(응용 계층)에서 정의하는 쿠버네티스 오브젝트
- 외부 요청 라우팅, 가상 호스트 기반 요청 처리, ssl/tls 보안 연결 처리 등에 사용
# 인그레스 사용하는 이유
- 디플로이먼트에 레플리카 3개 두고 nodePort로 외부 노출하는 경우 → 3개 포드 일일히 다 ssl/tls 보안 설정 해줘야 함
- 인그레스 사용하면 앞단에 인그레스 오브젝트 하나 두고 한번만 보안 설정해주면 됨
- 즉, 하나의 설정 지점에서만 처리 규칙을 정의해주면 됨
# 인그레스 생성
apiVersion: networking.k8s.io/v1
kind: Ingress
metadata:
  name: ingress-knuchat-bot
  annotations:
    nginx.ingress.kubernetes.io/ssl-redirect: "true" # http 요청을 자동으로 https로 리다이렉트
spec:
  ingressClassName: nginx
  tls:
    - hosts:
        - knu-chatbot.o-r.kr
      secretName: knu-chatbot-tls
  rules:
    - host: knu-chatbot.o-r.kr
      http:
        paths:
          - path: /
            pathType: Prefix
            backend:
              service:
                name: svc-clusterip
                port:
                  number: 80
# Ingress Controller
- 실제 외부 요청을 받아들이는 인그레스 컨트롤러에 인그레스 규칙을 로드해 사용 가능
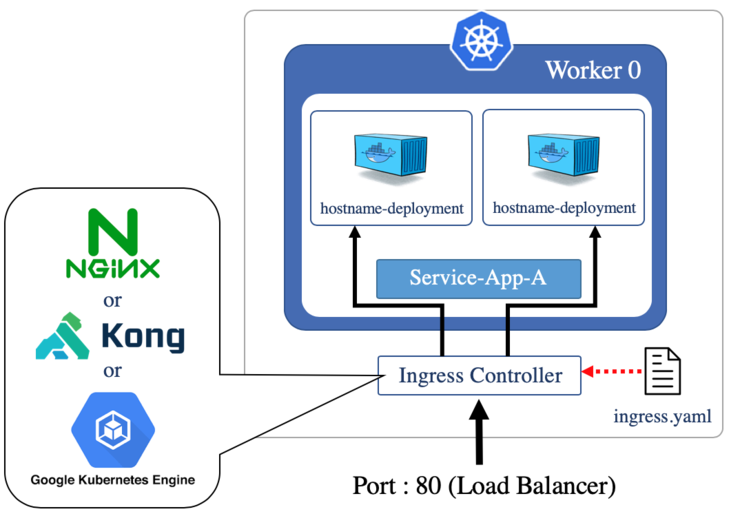
- 근데 인그레스 컨트롤러를 설치해도 nginx 웹 서버를 외부로 노출하기 위한 서비스를 생성해주지는 않음
- 정리하자면 인그레스 컨트롤러 설치 + 인그레스 규칙 정의 + 인그레스 컨트롤러를 외부로 노출하기 위한 서비스 생성
apiVersion: v1
kind: Service
metadata:
  name: ingress-nginx
  namespace: ingress-nginx
spec:
  type: NodePort
  selector:
    app.kubernetes.io/name: ingress-nginx
    app.kubernetes.io/part-of: ingress-nginx
  ports:
    - name: http
      port: 80
      targetPort: http
      nodePort: 32080
    - name: https
      port: 443
      targetPort: https
      nodePort: 32443

# 인그레스 세부 기능 - annotation
- 위에서 사용한
nginx.ingress.kubernetes.io/ssl-redirect옵션처럼 annotation을 사용하여 다양한 옵션 적용 가능 - ex
apiVersion: networking.k8s.io/v1
kind: Ingress
metadata:
  name: ingress-knuchat-bot
  annotations:
    nginx.ingress.kubernetes.io/ssl-redirect: "true" # http 요청을 자동으로 https로 리다이렉트
    nginx.ingress.kubernetes.io/rewrite-target: / # /test 경로로 들어온 요청은 /로 전달
      paths:
      - path: /test
    kubernetes.io/ingress.class: "nginx" # 해당 인그레스 규칙을 어떤 인그레스 컨트롤러에 적용할 것인지